I have been collecting StyleArc patterns like crazy. So I have decided that this year I am going to dedicate myself to using all of those patterns that I have collected. The wonderful thing about StyleArc is that they are easy patterns, but so stylish at the same time. I seem to be at point in my life where I really like "easy to where" items. I've had this StyleArc Ivy pattern in my stash for quite awhile:
I decided to use this reversible knit fabric that I found at JoAnn's:


This sewed up really quickly. Style Arc is know to have minimal details so their instructions wouldn't be the best for a beginning sewer. All of this was done on my serger with the exception of stitching down the bias for the neckline and the hemming A very quick and easy sew.
And here the side view on Mimi:

And the front view on Mimi:

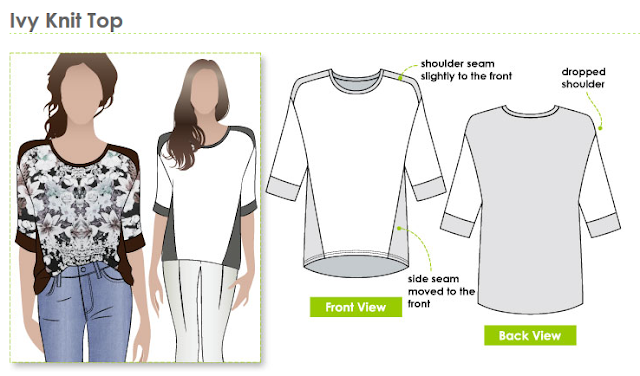
I have found that pattern drawings are not always indicative of the true drape of the item. This top is much looser at the hemline than the pattern drawing indicates. I also have a hard time judging what size to sew, especially when things are oversized and have lots of room. I think the next time I make this I will go down one size.
Size: 12, but I think I will go down one size next time I make it.
Fabric: Reversible knit - black and white stripes on once side, white polka dots on the other. I used the stripes for the front and sleeves and the polka dots for the back, the neck binding and the arm cuffs.
Design Changes: None at this time
Construction Notes: As with most things I like my neck binding a little tighter so it doesn't "flop" I might cut an 1" or an 1.5" off the next time. I did add a small strip of fusible knit to the hem (3/4"), folded it up 3/4" and then used a double needle to sew the hem. I find that using the fusible knit helps stabilize the hem and avoids the "tunneling" effect that you sometimes see with double needles on knit fabrics.
Will I make this again: Most definitely! This was an easy pattern and will be a good staple for weekend and casual wear. It was a nice quick sew and got it done from start to finish in one evening!
I decided to use this reversible knit fabric that I found at JoAnn's:

I love how one side has polka dots and the other stripes. I knew this would be perfect for this top as I wouldn't have to find other fabric for contrast. Once I cut out the pieces I had to decide how I wanted the contrast to work, so I laid out the pattern pieces and played until I found something I liked. So easy to do with this fabric, all you had to do was just flip it over to the other side! However once you started sewing you had to remember which you chose for as the front and which was the back.

This sewed up really quickly. Style Arc is know to have minimal details so their instructions wouldn't be the best for a beginning sewer. All of this was done on my serger with the exception of stitching down the bias for the neckline and the hemming A very quick and easy sew.
And here the side view on Mimi:

And the front view on Mimi:

I have found that pattern drawings are not always indicative of the true drape of the item. This top is much looser at the hemline than the pattern drawing indicates. I also have a hard time judging what size to sew, especially when things are oversized and have lots of room. I think the next time I make this I will go down one size.
Size: 12, but I think I will go down one size next time I make it.
Fabric: Reversible knit - black and white stripes on once side, white polka dots on the other. I used the stripes for the front and sleeves and the polka dots for the back, the neck binding and the arm cuffs.
Design Changes: None at this time
Construction Notes: As with most things I like my neck binding a little tighter so it doesn't "flop" I might cut an 1" or an 1.5" off the next time. I did add a small strip of fusible knit to the hem (3/4"), folded it up 3/4" and then used a double needle to sew the hem. I find that using the fusible knit helps stabilize the hem and avoids the "tunneling" effect that you sometimes see with double needles on knit fabrics.
Will I make this again: Most definitely! This was an easy pattern and will be a good staple for weekend and casual wear. It was a nice quick sew and got it done from start to finish in one evening!
Comments
Post a Comment